10 Best Condo Lighting Design Ideas That Work

Updated: Sep 9

A condo can have beautifully selected finishes and still feel flat, cramped, or unfinished when the lighting is treated as an afterthought. The best condo lighting design ideas begin with how you actually live: where you prepare meals, work late, relax with family, apply makeup, or welcome guests. Good lighting does more than brighten a room. It shapes proportion, supports daily routines, and gives a compact home a more considered sense of depth.
For most condo renovations, the goal is not to fill every ceiling with downlights. It is to create a layered plan that feels comfortable at every hour while keeping the ceiling clean, the circulation clear, and the electrical work practical to execute.
1. Build Every Room With Three Layers of Light
The most reliable lighting plans combine ambient, task, and accent lighting. Ambient lighting gives the room its general brightness, usually through recessed lights, ceiling fixtures, or indirect cove lighting. Task lighting focuses on activities, such as cooking, reading, working, or grooming. Accent lighting adds visual interest by highlighting artwork, textured finishes, display shelves, or architectural details.
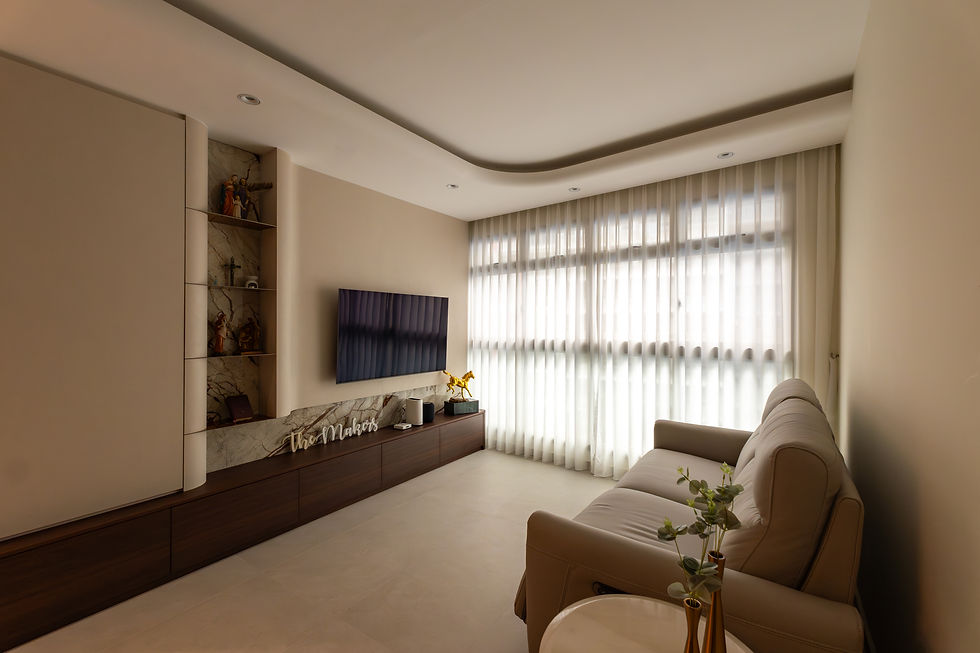
In a condo living room, for example, recessed lights may provide the base layer, a floor lamp can illuminate a reading corner, and a concealed LED strip can soften a TV feature wall. This combination is more flexible than relying on one bright central fixture. It also lets the room shift easily from a practical daytime setting to a calmer evening atmosphere.
Layering does require planning early. Each light source needs its own circuit or control grouping, which affects wiring, switches, ceiling construction, and budget. During design development, it is worth mapping the lighting together with furniture placement rather than deciding fixture locations after the renovation work has begun.
2. Use Downlights With Restraint
Downlights are popular because they are neat, unobtrusive, and well suited to lower condo ceilings. However, too many can create a grid-like ceiling and cast harsh pools of light across the floor. More fixtures do not automatically produce a better result.
A better approach is to place downlights where they serve a clear purpose: along circulation paths, near storage, above kitchen work zones, or around the perimeter of a living area. Avoid placing a downlight directly above the center of a sofa or dining table when a decorative fixture or indirect lighting will better support the space.
Beam angle matters as much as placement. Wider beams work well for general illumination, while narrower beams can highlight a wall finish or artwork. A professional lighting plan considers the ceiling height, fixture output, floor finish, and wall colors so the room is evenly lit without becoming overly bright.
3. Add Cove Lighting for Depth, Not Decoration Alone
Cove lighting can make a condo feel more expansive by washing light gently across the ceiling. It is particularly effective in living and dining spaces where homeowners want a refined evening mood without glare. When the main lights are dimmed, a soft cove glow can keep the room usable and welcoming.
The detail must be proportioned correctly. An oversized bulkhead can make a low ceiling feel lower, while a poorly concealed LED strip can reveal dots of light rather than an even glow. The recess, LED profile, diffuser, and maintenance access should all be resolved before construction.
Cove lighting is not necessary in every room. In a compact bedroom, a well-positioned bedside lamp and a pair of quiet downlights may be more useful than an elaborate false ceiling. The right choice depends on ceiling height, room size, and the overall design language.
4. Make the Dining Light a Deliberate Focal Point
The dining area is often where a condo benefits most from a statement pendant. A sculptural fixture defines the table, introduces scale, and makes an open-plan living space feel intentionally zoned. It can also become a visual anchor when the dining area has limited wall space for art or decoration.
The fixture should be sized to the table, not merely chosen for its appearance in a showroom. A pendant that is too small can disappear, while one that is too large may obstruct sightlines in a compact apartment. As a general guide, it should sit centered over the table and be hung high enough for clear conversation across it.
Put the dining pendant on a separate dimmer. Bright light is useful for meals, homework, and entertaining preparation, but a lower setting creates a noticeably better atmosphere after dark.
5. Treat the Kitchen as a Work Zone
Kitchen lighting should be designed around shadows. Ceiling lights alone often leave the countertop dim because your body blocks the light while you stand at the work surface. Under-cabinet lighting solves this issue directly, making food preparation safer and more comfortable.
Use a clean, continuous LED profile beneath upper cabinets where possible. It provides even task lighting and gives the backsplash a polished finish at night. Over an island or peninsula, pendants may add character, but they should not replace practical countertop illumination.
Choose fixtures that are easy to clean and specify lighting that does not distort food colors. Neutral white light is often a practical choice for kitchens, while warmer light may be better reserved for dining and lounge areas. Keeping these zones independently controlled allows the kitchen to perform well without making the entire home feel clinical.
6. Create a Bedroom Plan That Supports Rest
Bedrooms need gentle, controllable light rather than maximum brightness. Start with low-glare ambient lighting, then add task lighting at each bedside. Wall-mounted reading lights can free up nightstand space, which is especially useful in smaller condo bedrooms. Bedside pendants can achieve a similar effect but require careful coordination with the headboard, side tables, and electrical points.
Consider a soft LED strip beneath a bed frame, inside a wardrobe, or behind a headboard feature for low-level nighttime visibility. These details are most successful when they are functional, not merely decorative. A wardrobe light that activates when the door opens, for instance, is a small upgrade that improves the daily experience.
Warm light is generally more relaxing in bedrooms. Choose dimmable fittings where possible and avoid cool, blue-white light close to bedtime. If the room also serves as a workspace, separate the desk lighting from the bedroom's ambient circuit so work mode does not take over the entire room.
7. Give Bathrooms Better Mirror Lighting
A bathroom mirror lit only from above often produces unflattering shadows under the eyes and chin. For grooming, light should come from the front or both sides of the face. A backlit mirror can create a pleasant ambient effect, but it may not provide enough direct illumination on its own.
Pair it with vertical lights beside the mirror or a well-positioned frontal fixture. In a compact bathroom, this approach can make the room feel more like a finished suite while improving everyday usability. All fittings should be selected for the correct moisture exposure and installed according to building requirements.
8. Highlight Joinery and Storage Thoughtfully
Custom joinery offers valuable opportunities for integrated lighting. Illuminated display niches, glass cabinets, shoe storage, and open shelving can add depth to otherwise solid built-ins. In a living room, a softly lit shelf can balance a large TV wall. Near the entry, a lit cabinet can make keys, bags, and everyday essentials easier to find.
The key is restraint. Lighting every shelf can look busy and increase maintenance over time. Highlight only the areas that deserve attention, and use concealed profiles so the hardware does not distract from the cabinetry itself.
9. Plan Controls Around Real Routines
The best lighting design is only effective if it is easy to use. Think beyond a single switch at the door. A living room may benefit from separate controls for downlights, cove lighting, display lighting, and a floor-lamp socket. A bedroom can include bedside switching so no one has to get up to turn off the main lights.
Dimmers are one of the most valuable upgrades in a condo because they add flexibility without adding visual clutter. Smart controls can be helpful for homeowners who want scenes such as “Dinner,” “Movie,” or “Away,” but they should be chosen for reliability and ease of use. A manual switch should remain intuitive for family members and guests.
Before finalizing the plan, review it room by room. Ask what happens when you enter at night, wake up early, host friends, clean the space, or work from home. These practical moments reveal whether the controls are genuinely well considered.
10. Coordinate Lighting Before Construction Starts
Lighting decisions affect more than fixture selection. They influence false-ceiling depth, electrical routing, air-conditioning positions, curtain tracks, carpentry details, and access for future maintenance. A pendant may need additional ceiling support. An LED driver may need a concealed but reachable location. A cove detail may conflict with a sprinkler head or air-conditioning grille if it is not coordinated early.
For condo owners, building management requirements and approved renovation hours can also affect the construction sequence. A full-service design and renovation team can coordinate these moving parts from site measurement and design development through construction drawings, sourcing, and installation. That process reduces the risk of attractive ideas becoming costly site changes.
At The Makers Design Studio, lighting is planned as part of the complete interior experience, with attention to lifestyle, build feasibility, and the timeless quality of the finished home.
A well-lit condo should never feel like a showroom that only works at one brightness level. It should feel right when you are making coffee before sunrise, settling in after work, or sharing a long dinner at home. Start with the routines that matter most, then let the lighting quietly make each one better.


Comments